Still under the weather, but getting better each day. Today I even had a mild spring in my step. The first order of business was the matter of the leg length. Yesterday I had trimmed the leg sections so as to produce a table 30.5" tall. I emailed the client and described the situation and asked him what his preference would be, and received a reply in short order. The legs were then trimmed an extra half inch this morning, so the final table height will be 30".
Next on the agenda was to make some templates for the leg profiles. These I laid out on 1/4" MDF, then band-sawed and abraded them to the finished shape:

Both templates are long on the bottom to guide the router smoothly along and off - so they are about an inch longer than the sticks are at the bottom end. One of the templates does the back faces, and I have made a second template, which references off of the surfaces produced by the first, to work the front faces of the leg a small amount. This is something new.
After making the template for the rear faces, I looked at it, and though I hadn't drawn the legs with any profiling on their front faces other than some arris chamfers and the beading, I decided to do a little more to those two faces. I'll say it again, one of the benefits to design/build is that is it easy to make subtle adjustments as one goes along - the design is not a fixed entity, and the adjustments in this sort of continuous feedback loop I make will inform the next design process I undertake.
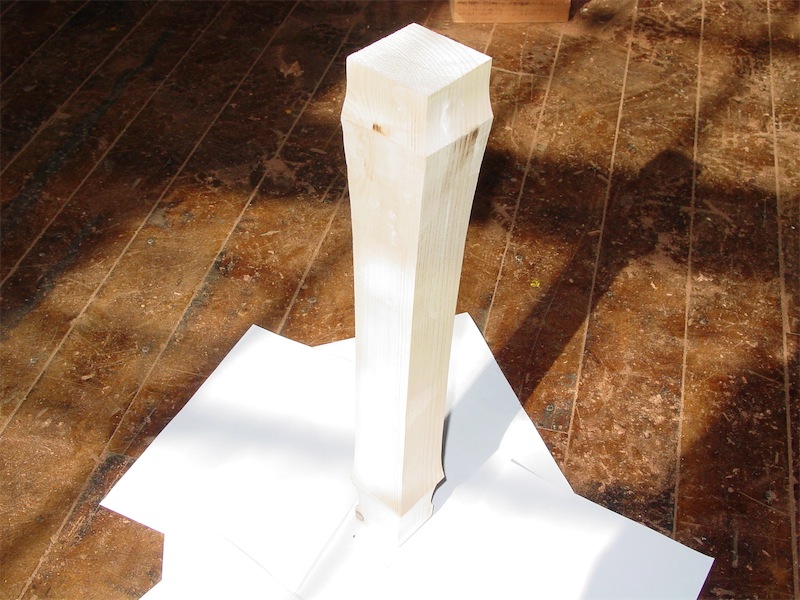
After the templates were ready, I was reminded (thanks John!) that it would be worth testing out the templates on a piece of material to see what the outcome looked like. I grabbed some white pine I had and used that as the guinea pig:

The profiling of the front face is slight - a gradual tapering in to a quick curved return lower down to define the 'feet' a bit better. I am paying mind to the Chinese traditional use of various foot treatments, of 'hoofs' in this piece, and knowing that the client had liked the work I had already done to the legs in the design phase, I think he will probably like this too. I do. Here's the view of the front faces:

Another view:

How about another view?:
And one more:

A closer look at the foot:

I made some subtle adjustments to the templates in a few places, then inked out the rear face cut lines on the bubinga legs:

Twenty minute's work on the bandsaw and the legs were roughed out:

Then it was time for a routing outing:

The first leg came out well:

Then there were two:

Finally, all four were done. I had a little tear out issue on one piece (hard to avoid with the curly grain), so I will have to do a small patch repair tomorrow. Not worth a photo.
I will confirm with the client before I move on to profiling the front faces of the legs - hence the large number of pics of those legs above. However, there is another issue to attend to before that profiling can take place: leg levelers. I think it is nice to have levelers on all four feet, instead of resorting to little shims or the like glued on. Tables can get moved a bit, and in the hopefully long existence this table is designed to have, you never know what sorts of surfaces it might end up on. While i still have tow flat reference faces it will be easier to make a jig to help guide the drill for accommodating the levelers.
UPDATE: the client has seen the prototype legs pictured above and likes the foot treatment, so I have the green light (or blue light if you're in Japan) to proceed.
I had purchased some screw levelers from Lee Valley a while back with a non-marring vinyl insert:
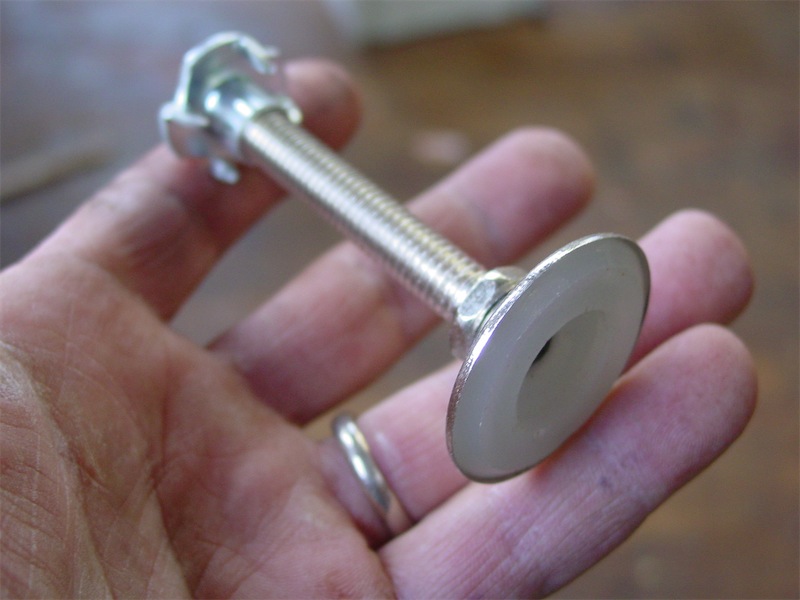
I started scheming about how I could mortise the bottom of the legs to receive these levelers, but the more i thought about it the more repelled I became. These levelers are, well, a little cheesy. If I spin the head around, little flakes of chrome will come off. Not exactly a product oozing quality.
So, to heck with that -I'll make my own levelers! I thought some Gabon Ebony levelers would be sweet for those puppies. So, I chucked up a hole saw in the drill press and made a test cut in some ebony to see how onerous a task that might be:

As it turned out, it wasn't a hassle to cut at all. Nice!
I then needed to obtain some metal hardware to create my own leveler assemblies. John upstairs suggested a few weeks back I check out the local hardware store, so now I had my chance. A quick 10 minute drive later and I was there - Florence Hardware:

Let me tell you folks, this was like a dreamy trip into the past. It's actually a REAL hardware store. Aisles close together and crammed full of stuff. Things crammed up to the rafters. And the staff actually know what they have in the store and where its located. Imagine that! They carried a diverse assortment of fasteners and I was able to cobble together the bits I needed for my leveler feet in short order. I was so happy to find a place like this! I'm so fed up with the box stores and the chain outlets which all seem to carry pretty much the same monoculture of stuff. Thank god there are still some small diverse outfits like Florence Hardware still around!! That's one store I will be frequenting in the future.
All for today. Tomorrow I'll complete the work on the levelers and their mortises and then can finish off the profiling work. Thanks so much for coming by today. Comments always welcome.
--> on to post 36
Hello,
ReplyDeleteI have been following your post with great interest. It is refreshing to find a craftsman building at such a high level. If I read another story about how to cut dovetails! I also build furniture and I use levelers on two of the four legs. I am very interested to see how you go about solving your dilema. Please cover that in some detail.
I have been absolutley amazed how stable the timbers have been with so much cutting and chopping. What a relief with all the close tolerances you must have in your design.
Wishing you the best.
Almost no floor is flat, so levelers will solve that, but given the weight of the table, isn't there the possibility that the legs will settle by themselves a bit to sit flat? It works that way sometimes.
ReplyDeleteGlad you didn't use the chrome feet!
ReplyDeleteEnjoyed the pic of the hardware store, just look at the decorative pillar tops. Table legs look very attractive.
John,
ReplyDeletefunny! Hmm, I was thinking it was time to do a write up on carcase dovetailing. Pins first or tails fir---. Okay, I'll shut up!
I though about using levelers on just two legs, but the table is long and not easily spun around. I want to level the table so that the top is really, well, level. So a marble or cylinder wouldn't roll off. Depending upon where the floor is out, you could get lucky with using levelers on two legs - or you could level out the teeter on two legs and have the table top on a slight slope. So, I'm putting the levelers on all four legs. There is no disadvantage to doing so, other than a little extra labor.
Djy,
well, what I understand is that "the legs settling by themselves" means the frame of the table will have to twist a slight amount to do that, and coming from a timber framing background, such an idea is not appealing at all for a structure of any kind. Besides, in older houses in New England sometimes the floor could be 1/2" or even 3/4" out from one end to another and I very much doubt that the table could flex out to accommodate that much unevenness. The last place I lived in had a very uneven pine plank floor that looked like an ocean swell in profile. And then in the winter with the frost heave it would get a little worse!
So I'd rather anticipate the issues ahead of time and try to provide so solution, though it is always possible that the installed location for this table will be perfectly flat and the levelers unnecessary additions - for the time being. Who knows where the table will be 50 years from now?
Gordon,
glad you like the table legs. To my delight the client really liked them too. Just imagine how they'll look once the finish gets applied and they are polished up a bit. I can hardly wait!
~Chris
Hi Chris,
ReplyDeleteAgain you show that you work at a higher level than most. I live in Montana and out here we are not allowed to have marbles at the dinner table so we dont need tables that level.
Wishing you the best,
John Deerman