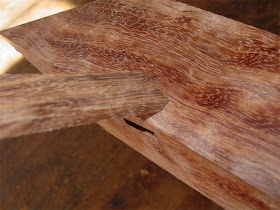
The first few hours revolved around the task of cleaning up the shachi sen mizo I had drilled out yesterday.
Starting with a bit of chisel work:

Then some side-to-side sweeps with the drill to clear most of the waste out:

A path is made through soon enough:

Then I clamp on a paring block to work on the end grain portions of the slots:

This one is at the 90% mark or so:

My next step was to make up a simple gauge the same thickness as the shachi sen, 0.1875" being the target:

This gauge was used to assess the slot, or mizo, and adjust as needed, and for final install I'll make up some pins which are a hair over-sized.
At first try, the test pins barely could enter the slots:

I've managed to get this one in an inch or so with a little chisel and file work:

A little further along, this time the view from the inside area:

'Done' - well, short of the final fitting session that is:

A while later I had all four legs complete through this stage:

Next up was the nail-biting delight of the leg shortening event. I triple-checked the numbers:

Then I rechecked my layout lines, and, leaving on a full half inch yet, I made the cut:

Still, the leg looks short to my eyes, but a lot of that has to do with the fact that the folded sword tip on the top end does not extend to the top of the table - it's 2" short of that point. And I am paranoid I guess. As things stand right now (which, literally speaking, they don't), the table would be 30.5" high. I'll check in with the client to see if he has a preference between 30" and 30.5".
Tomorrow I'll look to profile the legs to shape, as the leg joinery is pretty much done save for a little work on the yatoi-sen, or dovetailed draw bars.
Speaking of which, the first order of business on those draw bars was to start the trimming of the lower end tenons. The end tenons will engage into the mortises already done a few posts back on the Giant's Arm braces:

You'll possibly have noticed that yatoi-sen 'A' is missing from the above picture. I had processed its end portion to the same point as the above pieces, however I then noticed by measuring that the cheeks of the tenon were not parallel to one another. Dang! The cause was not immediately apparent, but soon enough I determined what was up.
Here's the stick clasped to the support piece I use for trimming the tenon- notice they fit fairly decently to one another along the edges:

Keeping my hand holding the same place, the other side shows a different scene:

What the above photo shows is that the stick had twisted significantly over the past month since it was cut out - not something I had been expecting as the bubinga is pretty stable generally. So, nothing else to do but toss that stick on the scrap pile and I set to work to make another one. That stick however didn't come out right so I had to make another! Practice is always helpful. Here's the replacement after I had at last caught up to where I had left off:

These tenons need to be dimensioned down yet on the narrow ends, but that shouldn't take too long.
A few more pictures than usual today, but what the heck? Thanks for coming by today and look for another posting sometime tomorrow. --> on to post 35
It looks like it is starting to come together....exciting! Wonder what sort of dining room/home, the table will be going into?
ReplyDeleteDjy,
ReplyDeleteI'm glad it's looking like it is starting to come together - some days I see nothing but hundreds of steps ahead and am almost going to be surprised when it will all be assembled. That day however is not far off at all now.
The setting for this is in a restored shingle style home, the dining area being fairly classic New England colonial in style. The client has an existing Chinese side table.
~Chris