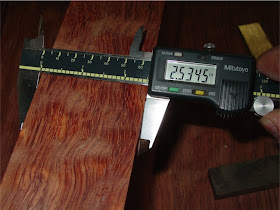
Earlier this week, however, I had at last reached the point where the bubinga was straight, square and at dimension, or very slightly above, as with the main frame rails:

The extra 1/32" of material over the 2.5" target is due to the fact I'll be running one face through the shaper in a few days.
One of the boards sliced up for the table top has been wanting to cup, so I've been massaging it back to straightness again with a combination of moisture, heat, and weighting:

It's is like a dance with that piece of wood, but it will follow along with my prodding.
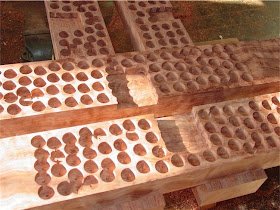
The main frame rails will have 0.75" of material removed from their inner faces along 80% of their length, and I have had some concerns about what the wood might do as a result of the removal of so much stock. Movement from moisture changes and/or the release of stresses by cutting could cause problems, so I tried an approach of doing things gradually. The first step, intended to allow the piece to equalize to moisture changes from inside to outside, was to perforate the side with a long session at the drill press, using a 1" Forstner bit:

A closer view:

The holes allow for any moisture to move in/out, and yet retain the bulk of the stick's cross section without severing completely across the fibers, which should help it stay straight. it's really little more than an experiment, but so far, several days later, there has been no appreciable movement in the wood. The housings that you see in the pieces are for the battens (on the long rails), and the center rib (on the short rails). I then routed these housings down exactly 0.745", which is a couple of scrapes shy of the target 0.75" depth.
Then I started rouging out some pieces which are involved in the locking mechanism to secure the legs to the frame rails (aprons). It was a chance to work on getting the shaper set up as well, which needed some minor tuning of its fences:

And I've started constructing some jigs to work the apron/rail joinery, starting with this little number:

Last, but not least, I promised a photo of the planing beam I had set up, so here ya go:

The needed shaper tooling should be in my hands early next week so it will be time to, uh, plunge right in once I have them. It's cool to have a shop space set up again after a few years, the last couple of which, as regular readers are well aware, were in my kitchen on saw horses. My wife seems pleased with the change too! It was tough moving from Canada to the US right after the economy plummeted and made the process of getting established all the more difficult. I will continue my efforts to promote the art of Japanese carpentry, at least as I practice it, and look forward to see what unfolds.
That then is my final post of the Carpentry blog here on the last day of the first decade of the 21st century. I look forward to 2011 and whatever it may bring, and plan to keep blogging away. I hope readers will keep returning to see what sort of trouble I can get into.
I wish my readers and fellow woodworkers out there all the best in your ventures for 2011. May it be a year of bounty and success, and challenges surmounted. Ganbatte kudasai!
Next up is post 11
Hi Chris, I am a first time poster here. I am REALLY enjoying this series on this table. I wish you all the luck with it. I had a question about the scrapper dia you made. Do you need to change the bevel on the bade at all or is it kept at the standard 30 degree angle?
ReplyDeleteChris,
ReplyDeletethanks for your comment! The plane blade in that dai has a steeper than 'normal' bevel angle of about 35˚. If the blade angle was left at 30 the edge retention would have been rather poor I think.
~Chris