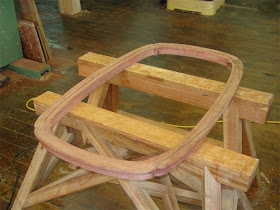
Last time, I had made a trip out to the CNC place and returned with the table top frame pieces. The legs have not been started yet, but they are next in the production stream, and should be completed sometime next week. Meanwhile, I have been working on the joinery to connect the frame corners together. I've chosen to use a combination of a floating stub tenon, which keeps the pieces from moving vertically in respect to one another, along with a quadruple-wedged drawbar, which will both align the joint horizontally and mechanically squeeze it together around the leg twin rebated tenons.
The first task was making the floating stub tenons, which were a hair over-dimension. Once trimmed to length, I got ready to do some final adjusting:
You can see in the above photo that the mortise in the frame miter has already been cut. These I did using a router and chisel.
The floating tenons were then trimmed for width using an improvised shooting board and a skewed block plane:
Here's the first one fitted into its mortise:
Then, let's see if it will assemble:
Well, I guess it's time to get busy on the drawbar mortises. First I placed a piece of MDF down, intending to use it as a fixture base plate:
The next bit was a little tricky - laying out the locations of the mortises. I had no straight lines, edges or corners to work from, so I had to think awhile before proceeding. Once I had some reference lines established, I used a trammel to set and then double-check the centerpoints of each mortise on the miter line:
Here's how the mortise lines shaped up:
I next prepared a piece of MDF to use as a router guide. This needed to be carefully set in position prior to routing, which took place in three separate steps, two routers, and two tool changes:
As I got closer to completion, I checked and adjusted until I had cut the mortise to the target depth of 1.000":
I was happy to be only 0.001" off:
Just lucky I guess, but I'll take it!
Taking the MDF template off, the drawbar mortise is revealed in 'rough' form:
Though the mortise is dimensionally accurate, I still need to trim the end walls of the mortise square, but that will have to wait a bit - first I needed to get the other three done:
That's where I'll leave off today. The mortise slots still need some work on them,which will be described in posts to come. All in all, I think they're going to work quite fine. Thanks for coming by the Carpentry Way today.
I'm heading to D.C. for a few days to visit the Library of Congress and do some research. I've got a long list of old books to dig through and it should be fun, and -as usual- a little maddening given the antiquated systems they use in that venerable facility.
The Online Carpentry Study group already has several members. Those wishing to get involved can email me and request a Paypal invoice for July. Lot's of fun ahead - I can hardly wait! --> on to post 10


Chris,
ReplyDeleteIs there a particular reason why you didn't get the big mortices milled when the pieces where CNC milled?
Roland,
ReplyDeletenext time, if there is a next time, I would get those mortises milled by CNC. At the time of cutting, I had not fully decided how I would do those connections, and elected to 'figure it out later'.
Thanks for the question!
~C