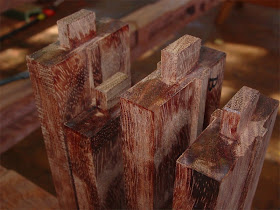
I spent the first half hour today finishing off the profiling and beading work on the final leg. Then it was time to work on the yatoi sen which hold the legs to the frame. While the stub tenons and grooves on the folded miters on the top of the leg contribute to the joining of the parts, these yatoi sen are the primary connection device I have chosen. I'm again adapting a joint from Japanese timber carpentry to furniture making.
Yatoi sen - written in Japanese as '雇い栓'. The character which is read yatoi, '雇', comprises an upper part, '戶' which means doorway and a lower, or enclosed part, '隹', which stems from a pictograph of a short, squat bird:

Can you see how that pictograph could be drawn in a more rectilinear form as '隹'?
Okay, a short squat bird and a doorway... what could that mean? Well, originally, it meant thrust a bird through the door of a cage, then shut it to contain the bird within. Over thousands of years, the meaning has semantically shifted, and now means, to employ, hire, and pay (for services). I think the original meaning of inserting something into a narrow opening and then closing up over that opening afterwards to trap that something inside is the most likely reason why the pin is called yatoi-sen. It's hardly logical to call it the 'hired pin', now is it? Hence the necessity to study the etymology of Sino-Japanese characters to really understand them. If one looks only upon the modern definitions, then in many cases the meaning will not always be very clear, the above case being a good example.
Yatoi-sen are a type of spline with a dovetailed end which act as tenons. These connections are also called yatoi hozo - hozo meaning 'tenon'. The dovetailed end is inserted into one member first, slid into place to engage the dovetail, and then the other piece is has a slot mortise and slides onto the yatoi sen. When the parts are together, other fixing pins, shachi sen, enter crosswise to the dovetailed spline tenon to secure and tighten the connection.
I started work on the yatoi sen with some layout and marking gauge work:

Lines incised, out came the saws, first cross cut:

Then rip cut:

Followed by a modicum of chisel work to clean up the shoulders:

A while later the tenons were done:

These are the tenons which will fit to the mortises in the lower ends of the Giant's Arm braces, the cut out of which was detailed a few posts back.
Next step was to cut the front edges of the sen to a 45˚:

Then I slid the yatoi sen into the slot mortises on the legs:

A closer look at one of them:

The assembly of the sen to the leg then allowed me to flush the surfaces precisely to one another with some planing:

Once the sen's 45˚ faces were faired to match the legs faces, I pulled them out. Then I started fitting the tenoned ends to their respective Giant's Arm braces. Here's 'C' sen and 'C' brace together at last (they've had a long distance relationship up until now):

A look at the connected pieces from another angle:

The fits of those parts were fine, so I went on to fit that sub-assembly back on to the legs:

Tapping the parts in further now:

Fully inserted, here's a view from the upper end of the leg:

Let's mix and match our languages now shall we?: With the yatoi sen and banwancheng all in, I transferred layout locations for the shachi sen mortises:

Here's a look at the completed layout:

All for today. Another post tomorrow. Thanks for coming by the Carpentry Way. Comments, questions, etc., of course are always welcome. --> go to post 43
Nice! Really enjoying your project (and this blog), love the detailing!
ReplyDeleteisambard,
ReplyDeletehey, thanks so much for your positive comments! Glad you are enjoying reading about the project!
~Chris