I put the four legs aside from the cut out depicted over the previous two postings, and set to work on the banwancheng, or Giant's arm braces. Normally I take my data points and draw out such curved pieces in full scale. This time I decided to experiment with using a large format printer, or plotter, to produce a full scale piece direct from SketchUp. I was curious to see how accurate the printed version would be to the drawing and how the shape/lines turned out in relation to the digital representation I had constructed. Here's the print out:

As for accuracy, it was excellent, though I can't know how well this would work with a piece that is, say, 100" long or more. For a 30" long item, it seemed fine.
I used some spray adhesive to apply the paper to a 1/4" piece of fiberboard, trimming the excess away:

While the dimensions were good, the lines were not so sweet. It's very hard to tell in a digital representation, using bezier curves, exactly how 'fair' a given curved line is. In this case, I felt I had to make a few adjustments:

Adjustments done, then I trimmed away half of the waste:

I used this half template to produce a copy in 0.5" fiberboard, using the router table:

With the other pattern made, I cleared away the other half of the waste from the 1/4" template:

I then used a Sharpie marker to outline the template on the stock:

Here are the rough cut blanks after a run through the band saw:

I then set those pieces aside for a day to let them move as they needed.
The next day I jointed the pieces and planed them to dimension. Sure enough, a couple of them had moved a bit. No problems though. I took that 1/2" thick template and used it to make a duplicate and then constructed a jig. With that jig, I was able to effect end cuts on all the giant's arm braces, and then started in on the joinery. I began by working on the lower ends which will tie to the legs:

As you can see the router bit is not the sharpest and is burning a little, but at least I was able to borrow it from John Z upstairs (and am most grateful), as my small pattern bit seems to have vanished, like my card scrapers. When I get into this stage of a project, sometimes I start to lose stuff. It will turn up later I'm sure. Things are bit chaotic I guess right this minute. At least I know where all the table parts are and can find my way home at the end of the day!
Another shot of the lower end of one of the braces:

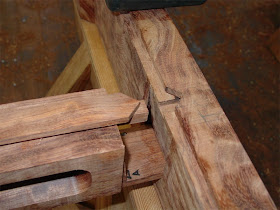
Another thing I have been working on has been the fitting of the central rail to the short aprons:

These sword tip miter joints are quite finicky to fit, and it really comes down to one pass too many with a chisel or plane and the fit will be ruined. Caution is in order, so I take my time with the process - not easy when feeling under some pressure - and do this sort of fitting work in the morning hours when I am mentally and physically fresh.
The joint was quite tight to start. Chiseling a little here and there, I gradually eased it further and further in:

This joint is the only one one table which is overtly obvious to view, as there is a through tenon coming out the the curved face of the apron. Therefore, I had to be careful with the fitting here as well. In the next picture, the tenon has just reached the surface:

Once things start getting closer together, it is important to check that everything is lined up square:

And here we are, the fitting to the 80% mark or so on both ends:

More to come - I wonder how these joints will come out? Stay tuned and thanks for visiting today. --> on to post 30
No comments:
Post a Comment
All comments are moderated. Spamming and comments containing links unrelated to blog content will be deleted.